SAML (or more specifically, SAML version 2.0) is what brings Single-Signon to SURFconext – being able to authenticate only once to your home university (or Identity Provider in SAML parlance) and subsequently login to many applications (or Service Providers) without having to type in a password again. So how does that work?
Actually, although SAML 2.0 is quite complex technology, and its specification comprises many pages divided over multiple documents, only few parts are used in SURFconext and they are really not that hard to understand. What basically happens is that IDP and SP exchange SAML protocol messages through the user’s browser. The SP sends an SAML authentication request message to the IDP, asking to authenticate the user. The IDP typically asks the user for a username and password (although any other method of authentication can be used) and if the password is correct, the IDP sends back a SAML authentication response stating that the user has just logged in successfully at the IDP, together with some proof that the message was indeed sent by the IDP.
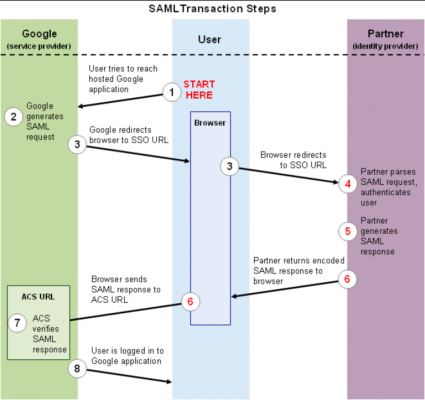
So, let’s take a look at what happens when someone wants to log in at a Service Provider (SP) that uses federated authentication for one of its customers (the IDP). For the sake of example, let’s say the SP is Google Apps and the IDP is an organisation called My University, where Alice is a student. The flow of SAML protocol messages can be illustrated in a diagram as follows:

Now, when Alice wants to read her mail using a web browser, she typically navigates to a webpage like https://mail.google.com/a/my-university.nl (step 1 in the diagram above). For a federated Google Apps domain, Google will not ask for a username and password to log in, but instead redirect the browser to the IDP for authentication – step 3 in the diagram. The URL the user is redirected to might look something like (strongly abbreviated):
https://idp.uni.nl/sso?SAMLRequest=fVLLTuswEN0j8Q…c%3D
Embedded within this redirect message (as the SAMLRequest parameter) is a SAML authentication request message. As SAML is XML-based the complete authentication request message is compressed (to save space in the URL) and encoded (because many characters are not allowed in URLs). If we get rid of the encoding and compression, the SAML message might read something like this (slightly simplified):
<AuthnRequest ID="kfcn...lfki"
    Version="2.0"
    IssueInstant="2013-02-05T08:28:50Z"
    ProtocolBinding="urn:oasis:names:tc:SAML:2.0:bindings:HTTP-POST"
    ProviderName="google.com"
    AssertionConsumerServiceURL="https://www.google.com/a/uni.nl/acs">
    <Issuer>google.com</Issuer>
    <NameIDPolicy AllowCreate="true"
        Format="urn:oasis:names:tc:SAML:1.1:nameid-format:unspecified"/>
</AuthnRequest>
In plain English, this message more or less reads “this is a request from Google. Please authenticate the user sending this message, and send the result back to Google”.
When the IDP receives this message and decides to grant Google’s request, it will authenticate Alice by asking her to enter her credentials (unless she already did – for example when having logged in at another service earlier – in which case single sign-on is triggered by simply skipping authentication). After successful authentication, Alice’s browser is sent back to Google at the so called AssertionConsumerService URL (step 6). As before, a SAML protocol message is piggybacking along – this time carrying a SAML authentication response message. When we decode this message, this is in essence what it looks like:
<Response Version="2.0"
		Issuelnstant="2013-02-05T08:29:00Z"
		Destination="https://www.google.com/a/my.uni.nl/acs"
		InResponseTo="kfcn...lfki">
	<Issuer>https://idp.uni.nl/</Issuer>
	<Status>
		<StatusCode Value="urn:oasis:names:tc: SAML:2.0:status:Success" />
	</Status>
	<Assertion Version="2.0" Issuelnstant="2013-02-05T08:29:00Z">
		<Issuer>https://idp.uni.nl/</Issuer>
		<Subject>
			<NameID>alice</NamelD>
			<SubjectConfirmation...>
				<SubjectConfirmationData
					NotOnOrAfter="2013-02-05T08:34:00Z"
					Recipient="https://www.google.com/a/my.uni.nl/acs"
					InResponseTo="kfcn…..lfki"/>
			</SubjectConfirmation>
		</Subject>
		<Conditions>
			NotBefore="2013-02-05T08:28:30Z"
			NotOnOrAfter="2013-02-05T08:34:00Z"
		</Conditions>
		<AuthnStatement>
			AuthnInstant="2013-02-05T08:29:00Z"
			SessionNotOnOrAfter="2013-02-05T16:29:00Z"
		</AuthnStatement>
	</Assertion>
<Response>
Here, we simplified the message some more, as SAML response messages can be quite verbose. In essence, this message says “this is a message from idp.uni.nl. I have successfully authenticated a user called ‘alice’. This message will expire in a couple of minutes”. One essential piece of information that was deleted from the message above for brevity is an XML digital signature, that is used as proof that the message was indeed sent by idp.uni.nl, and that the message was not tampered with along the way. The digital signature was made using a public key algorithm and the public key needed to verify the signature is embedded in a certificate that is known to Google.
So, when Google receives the SAML authentication response message, it first verifies the XML signature (step 7), checks various conditions (for instance if authentication was successful or if the message expired), extracts the user’s identifier as known to Google (called the NameID – “alice” in our example). If everything is fine, Alice is logged in (step 8) – her mailbox is retrieved and she can start reading her mail.
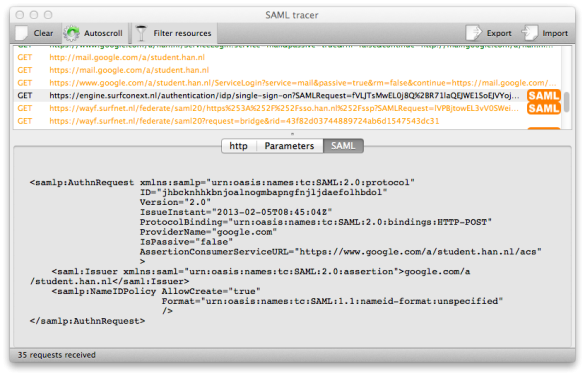
In effect, there’s a lot more than meets the eye when logging on to an SP using SAML. In the SAML messages above I removed some information to keep the example readable. If you would like to see some real-world SAML, I can recommend a tool called SAML tracer, which works as a Firefox plugin. It adds a viewer window to Firefox that automatically decodes and shows SAML messages. Here’s a screenshot from a real authentication request from Google:

Hopefully, by now you have a better idea of how SAML works. There is a lot more to tell about SAML, but a far as Web Single Sign-on is concerned, this is basically it. You may wonder where exactly SURFconext should be positioned in al this. In fact, SURFconext acts as a proxy between the IDP and the SP. Although this slightly complicates matters when relaying messages between IDPs and SPs, the same basic idea as sketched here applies. And then there are aspects of SAML that I haven’t touched upon, such as metadata and attributes. I’ll save those for another post.
If you have a question or suggestions for my other post, please let me know: mail at joost.vandijk@surf.nl.


0 Praat mee